SFTP Setup using Password and Key based 2FA Authentication
High performance and scalable tech always fascinated me and I aim and work towards getting the skills to develop and improve such tech. Currently pursuing Masters in Cloud Computing. Would love to connect and discuss opportunities and tech !
If you ever needed to use password and key based authentication to enable a 2FA type mechanism to increase security, this blog is for you.
OS used here is CentOS Linux , so lets get started!
Check SSH
SFTP unlike FTP doesn’t required additional packages in order to use SFTP. We use the prebuilt sshd package which is usually installed during OS installation. We can check it using the command
rpm -qa | grep ssh
If you don’t get any output, it means you will need to install the ssh package.
Configure SFTP
First we will create a directory where all the SFTP related files from various users will be stored. Log in as root to create directories. We can become root using command ‘sudo su’
mkdir -p /data/sftpdata/
chmod 701 /data/sftpdata/
All the SFTP users will have sub directories within this main directory.
Now, lets create a group for the SFTP users. Lets call it ‘sftpusers’
groupadd sftpusers
We then create a user named ‘jason’ and add it to the ‘sftpusers’ group and set a secure password
useradd -g sftpusers -d /files jason
passwd jason
‘files’ is the home directory for the user jason. Access will be limited to this folder where he/she will be uploading/downloading files from.
Now lets create ‘files’ folder under ‘/data/sftpdata/’ and set the appropriate permissions and ownerships.
mkdir -p /data/sftpdata/jason/files
chown -R root:sftpusers /data/sftpdata/jason
chown -R jason:sftpusers /data/sftpdata/jason/files
We will now configure SSH to create an SFTP process by editing the config file /etc/ssh/sshd_config .
Add the below lines at the bottom of the file
#PasswordAuthentication yes
Match Group sftpusers
ChrootDirectory /data/sftpdata/%u
ForceCommand internal-sftp
AuthorizedKeysFile /etc/ssh/authorized_keys_%u
AuthenticationMethods "publickey,password"
Lets understand what did we do here.
- Firstly the line ‘Match Group sftpusers’ says apply the settings below for the users that belong to the sfpusers group.
- ‘ChrootDirectory /data/sftpdata/%u ‘ says that limit the access for the user to /data/sftpdata/%u where %u is like a placeholder for the username that is trying to log in.
- ‘ForceCommand internal-sftp’ says that dont allow ssh access, only use the sftp protocol
- ‘AuthorizedKeysFile /etc/ssh/authorized_keys_%u’ says that the keys for the user trying to login will be the at location /etc/ssh/authorized_keys_%u where again %u is a placeholder for the username trying to log in
- AuthenticationMethods “publickey,password” says that use the key and password for login. Either one is missing and the login will fail
Now we restart the ssh service
service sshd restart
The SFTP server is now setup. We will now proceed to key generation.
Generate keys
We will now generate keys for the user jason using the ssh-keygen utility. We will use the RSA algorithm. The keys will be created and stored in a file named authorized_keys_jason because we had mentioned this format in the sshd_config file.
ssh-keygen -t rsa -f authorized_keys_jason
When asked for passphrases you can keep it empty and press Enter.
If you are making use of passphrase make sure to remember it and keep it secure, without it the key wont be usable even to the user ‘jason’.
The ssh-keygen utility will create a public key and a private key.
The public key ‘authorized_keys_jason.pub’ will be stored in /etc/ssh/ directory and the private key will be sent to the user.
cp authorized_keys_jason.pub /etc/ssh/authorized_keys_jason
Give the correct permissions to the key so that it cant be accessed by any other user
chown jason /etc/ssh/authorized_keys_jason
chmod 700 /etc/ssh/authorized_keys_jason
The private key ‘authorized_keys_jason’ should be sent to the user ‘jason’ . The ways of transfer can differ on environment basis. The keys should be kept secure.
We will connect to this SFTP server from a Windows Environment using the WinSCP tool
SFTP tool setup on client side
In a normal use case we would have required just the username, password and the IP address of the SFTP server.
Because we are using keys to ensure 2FA by something you know (password) and something you have(private key) we will need to do few things.
As we are using the WinSCP tool, it doesn’t support the OpenSSH key format which was generated by on our server. Hence first we will need to convert this key into a Putty private key (ppk) format to use it for login
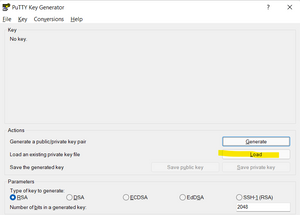
We will use the PuTTYgen which is available with the PuTTY tool.
Open the tool and click on load to select the private key
Select the private key
Now click on save private key and Click Yes
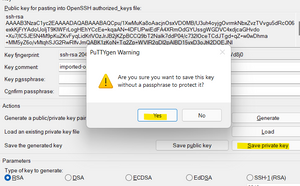
Save the private key and keep it secure
We are all set now.
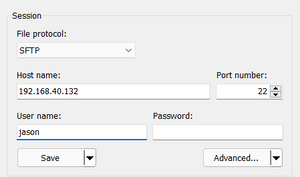
Connect to SFTP server
Open WinSCP and enter the IP of the SFTP server and the username ‘jason’
To use the private key , we click on Advanced
From the left menu click on SSH → Authentication
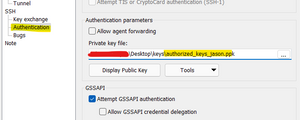
Load the private key file.
Back to the main page click on Save and then click Login
Enter the password when asked for and we are in !
Note: This Blog was reposted from my personal website

