SSH certificates in Linux - Step by Step Guide
Step by Step guide to implementing SSH certificate-based authentication

High performance and scalable tech always fascinated me and I aim and work towards getting the skills to develop and improve such tech. Currently pursuing Masters in Cloud Computing. Would love to connect and discuss opportunities and tech !
We got a basic understanding of what SSH certificates are in the previous blog. Now let's actually see how they can be implemented.
In this blog, we are going to consider one CA which will be our trusted certificate authority. In larger environments, multiple CA's can be configured to serve the purpose.
CA's private key will be used to sign the user and host public keys. The CA's public key will be important as the SSH server will use this key to verify the certificates and check if the certificate sent by the user was signed by the Trusted CA key or not.
So, let's get started
1. Generate CA keys
We use the ssh-keygen command to generate a public and private key pair for the CA. We use the ed25519 algorithm here. The name of the key file will be 'ca'
ssh-keygen -f ca -t ed25519
-f stands for filename and -t for the algorithm.
On completion, we get two files ca and ca.pub
2. Generate the Host Certificate
Hosts keys and certificates are used to authenticate hosts(servers) to the user. To elaborate, the user needs to know if he/she is connecting to the correct server.
Remember the message or pop-up you receive on connecting to a new server? It's because the user's machine(client) hasn't met this new server before. Hence it asks you, have you seen this server before? And most of the time we click on yes.
However, to avoid advanced methods by adversaries (hackers) it's good to tell the client machine i.e the user's machine which servers it should trust beforehand.
First, we generate the host keys.
ssh-keygen -f centospc -t ed25519
Then we use the previously generated CA's private key to sign the host's public key file. By doing this we generate a certificate that is digitally signed by the CA.
ssh-keygen -h -s ca -n centospc.rcdomain.com -I centospccert -V +12w centospc.pub
-h for host
-s file used for signing
-n principal name (who will use the certificate)
-l description
-V +12w certificate is valid for 12 weeks
For the user/ssh client to trust the host/server we paste the contents of the centospc-cert.pub file in the 'known_hosts' of the client. This file can be in the .ssh directory for the user or in the /etc/ssh directory for all users.
Note: In the current demo environment the servers have a hostname of server_name.rcdomain.com
@cert-authority *.rcdomain.com ssh-ed25519 AAAAC3NzaC1lZDI1NTE5AAAAIEu7Zy+F2hBvXweHtf+n/gumNdk/rzenB7kPJxFohYY6 rctest@centospc
In the /etc/ssh/sshd_config file of the host/server, we add these lines
HostKey /etc/ssh/centospc
HostCertificate /etc/ssh/centospc-cert.pub
TrustedUserCAKeys /etc/ssh/ca.pub
Restart sshd on config change
On doing this, we won't get the 'Do you trust this host' message whenever we try to connect from a client that has this setting configured.
3. Generate User Certificate
In normal ssh key-based authentication, we place the public key of the user in the authorized_keys file. However, with the use of certificates, we won't have that hassle.
Let's start with creating the user ssh keys
ssh-keygen -f jake -t ed25519
Then we sign the user public key with the ca private key and generate the certificate.
ssh-keygen -s ca -I jakecert -n jake_rcdomain.com -V +12w jake.pub
On each server that will use the certificate-based authentication, we need to add the below line in the /etc/ssh/sshd_config
TrustedUserCAKeys /etc/ssh/ca.pub
Restart sshd on config change.
Note: We don't need the ca private key on any server using certificates. ALWAYS KEEP THE PRIVATE KEY SAFE! You can perform the key signing operations on an isolated server.
The server will use the ca.pub public key to verify the digitally signed user certificates.
3. Authenticating from the client
Authentication from the client to the server is very similar compared to using keys
ssh -i jake jake_rcdomain.com@centospc.rcdomain.com
You may wonder if I just pass the private key in the argument of the ssh command, where and how are the certificates even used?
The ssh daemon will search for the user certificates ending in -cert.pub and use them automatically if it finds them. [Further reading links in the resource section]
Do clients like WinSCP and PuTTY support ssh certificates?
As far as I could research, this functionality is unfortunately not implemented in such clients that are commonly used on Windows.
Some links that refer to the same
4. Can User A use User B's certificates?
No, one user cannot use a certificate generated for another user.
Why?
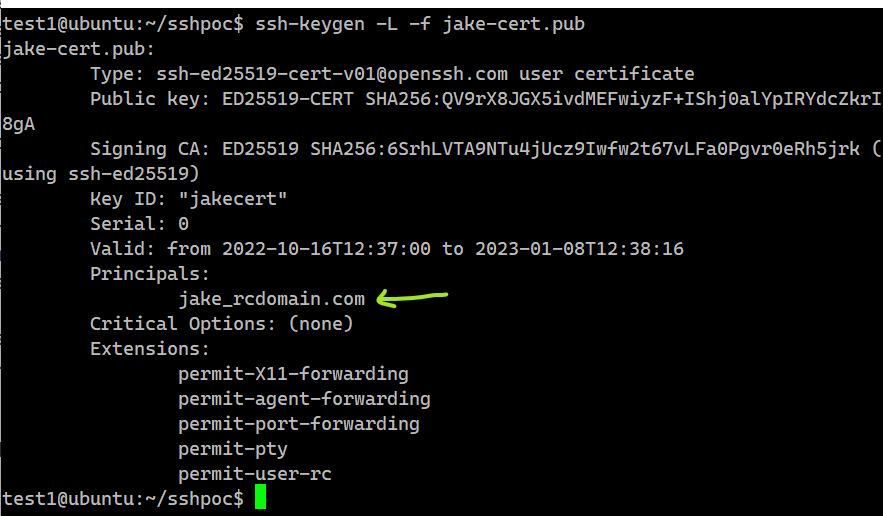
Because, while signing the certificates "-n principalnames" argument was used, the certificate is valid only for the usernames/ hostnames which were mentioned during the certificate creation.
You can view the ssh certificate using
ssh-keygen -L -f jake-cert.pub
You can add more users/hosts like
ssh-keygen -s ca -n user1,user2,admin user.pub
5. Revoke the Certificates
To revoke the certificates, add this line to the /etc/ssh/sshd_config
RevokedKeys /etc/ssh/revokedkeys
You can add the contents of the certificate you want to revoke in this revokedkeys file
When you try to login it won't allow. On trying to log in, logs in /var/log/secure shows the following

6. Certificate expiry
The certificate can have an expiry date set which is set using the -V flag during certificate generation
In the earlier section, we used 12 weeks which was stated as -V +12w.
On trying to login, the logs in /var/log/secure show the following

That was it for SSH certificates. If you liked it or disliked it, do let me know by using the reaction button or by sharing your views in the comment section
Resources
